Effortless Linux VM Deployment on Windows: A Comprehensive Tutorial


Introduction to virtualization
Imagine you have a computer with only one operating system installed, like Windows. But what if you want to use a different operating system, like Linux? One option would be to install Linux on a separate physical machine, but that can be expensive and take up a lot of space. Another option is to use virtualization.
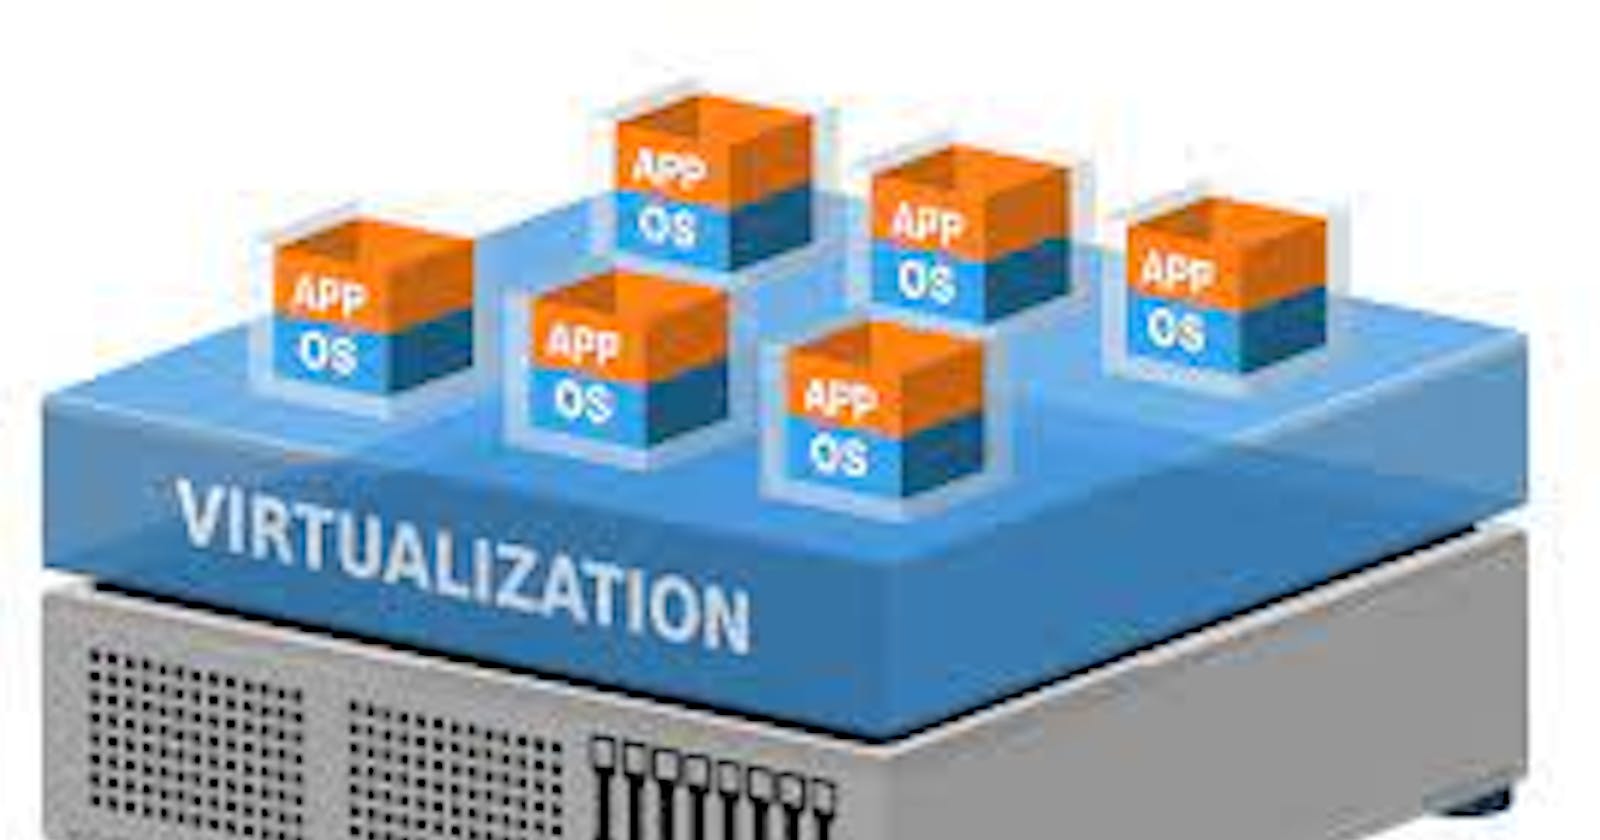
Virtualization is like having a computer within a computer. It allows you to run multiple operating systems on the same physical machine, without having to create separate physical partitions for each one. This is done by using a software program called a hypervisor, which creates virtual machines (VMs) that emulate the behaviour of a physical computer.
Virtualization is a powerful technology that allows you to run multiple operating systems on a single physical machine, creating cost savings, flexibility, isolation, and scalability. By using virtual machines, you can experiment with different software environments, test new configurations, and improve overall efficiency.
Choosing a virtualization software
With so many options out there, it can be tough and overwhelming to figure out which one is right for you. So let's take a brief tour:
First things first, it's important to determine what you need your virtualization software for. Are you a gamer looking to run older games that don't work on your current system? Are you a developer looking to test your software on multiple platforms? Or are you just looking to run multiple operating systems on a single machine for convenience? Once you've figured out your needs, you can start looking at the various virtualization software options available.
One popular virtualization software is VMware Workstation. This software is great for developers, as it allows you to create and test applications on multiple operating systems without having to switch between machines. It also has a variety of tools and features that can make your development work easier, such as the ability to take snapshots of your virtual machines and revert to previous states if something goes wrong.
If you're a gamer, you might want to check out VirtualBox. This free and open-source virtualization software is great for running older games that might not be compatible with newer operating systems. It also has a user-friendly interface that makes it easy to set up and use, even if you're not a tech expert.
Now, let's talk about the importance of compatibility. When choosing a virtualization software, it's important to make sure that it's compatible with your operating system and hardware. For example, if you're using an older computer, you might not be able to run the latest version of VMware Workstation, as it requires more powerful hardware. Make sure to check the system requirements before you make a purchase or download any software.
In summary, choosing the right virtualization software is all about understanding your needs, considering compatibility and support, and finding a software that fits your budget. With so many options out there, you're sure to find one that's perfect for you.
Downloading and installing Linux VM on Windows
Here's a step-by-step guide on how to download and install a Linux virtual machine on a Windows system.
First, you need to ensure that your computer's virtualization feature is turned on. This feature is usually disabled by default in the BIOS, so you need to access the BIOS settings to enable it. Restart your computer and press the key indicated on your screen to access the BIOS settings (usually F2 or Del). Look for an option called "Virtualization Technology" or "Intel Virtualization Technology" and enable it. Save and exit the BIOS settings.
Next, you need to download a virtualization software. One popular option is Oracle VirtualBox, which is free and open-source. Go to the VirtualBox website (https://www.virtualbox.org/) and click on "Downloads" in the top navigation menu. Then, select your operating system (Windows) and download the latest version.
Once the VirtualBox installer is downloaded, double-click on it to begin the installation process. Follow the prompts to install the software on your computer.
After installation, launch VirtualBox. Click on "New" in the top-left corner to create a new virtual machine.
In the "Name and Operating System" window, enter a name for your virtual machine (e.g. "Linux VM") and select "Linux" as the type. Then, select the version of Linux you want to install (e.g. Ubuntu, Fedora, etc.) from the drop-down menu. Click "Next".
In the "Memory Size" window, select the amount of RAM you want to allocate to the virtual machine. The default is usually 1 GB, but you can adjust it according to your needs. Click "Next".
In the "Hard Disk" window, select "Create a virtual hard disk now" and click "Create".
In the "Hard Disk File Type" window, select "VDI (VirtualBox Disk Image)" and click "Next".
In the "Storage on Physical Hard Disk" window, select "Dynamically allocated" and click "Next".
In the "File location and size" window, enter a name for your virtual hard disk and select the size you want to allocate to it. The default is usually 8 GB, but you can adjust it according to your needs. Click "Create".
Once your virtual machine is created, select it from the list on the left-hand side of the VirtualBox Manager window and click on "Settings".
In the "Settings" window, select "Storage" from the left-hand menu. Then, click on the "Empty" CD/DVD drive under "Controller: IDE" and click on the CD icon on the right-hand side. Select "Choose Virtual Optical Disk File" and browse to the location of your Linux ISO file. Select it and click "Open".
Click "OK" to save your settings and return to the VirtualBox Manager window.
Finally, select your virtual machine from the list and click on "Start" to launch it. The Linux installation process should begin automatically. Follow the prompts to install Linux on your virtual machine.
Configuring the Linux vm
With these simple steps, you can configure your Linux virtual machine in VirtualBox to your liking:
Launch VirtualBox and select the Linux virtual machine you want to configure.
Click on "Settings" to access the virtual machine's settings.
The first tab is "General". Here, you can change the name of the virtual machine, as well as the type and version of the operating system. You can also adjust some basic settings like the amount of video memory and the default folder for the virtual machine's files.
The "System" tab allows you to configure the virtual machine's hardware. Here, you can adjust the amount of RAM and CPU cores allocated to the virtual machine, as well as enable or disable hardware acceleration features like VT-x/AMD-V and nested paging. You can also configure the boot order and select which type of BIOS to use.
The "Display" tab allows you to adjust the virtual machine's display settings, including the screen resolution, monitor count, and 3D acceleration support. You can also enable or disable features like the clipboard and drag-and-drop support.
The "Storage" tab allows you to configure the virtual machine's storage settings. Here, you can add or remove virtual hard disks and optical drives, as well as adjust the settings for each storage device. You can also configure the virtual machine's virtual SCSI controller and select the type of storage media to use (e.g. VDI, VMDK, or raw disk access).
The "Audio" tab allows you to enable or disable audio support for the virtual machine. You can also adjust the audio input and output settings, as well as select the audio driver to use.
The "Network" tab allows you to configure the virtual machine's network settings. Here, you can enable or disable network adapters, select the type of adapter to use (e.g. NAT, Bridged, or Host-only), and configure advanced settings like port forwarding and DHCP.
The "USB" tab allows you to configure the virtual machine's USB settings. Here, you can enable or disable USB support, as well as configure filters to control which USB devices are allowed to connect to the virtual machine.
The "Shared Folders" tab allows you to configure shared folders between the host and virtual machine. Here, you can add or remove shared folders, as well as configure the settings for each shared folder (e.g. read-only or read-write access).
The "User Interface" tab allows you to configure the virtual machine's user interface settings. Here, you can adjust settings like the language, keyboard layout, and mouse behavior.
Once you have made all the necessary configurations, click "OK" to save your changes and exit the settings menu.
Best practices for managing virtual machines
By following these tips, you'll be a virtual machine management pro in no time:
Keep them updated: Make sure to regularly update your virtual machines with the latest patches and updates. This helps keep them running smoothly and securely.
Take snapshots: Snapshots are like a time machine for your virtual machines! They allow you to save a copy of your virtual machine at a specific point in time. This is super helpful if you need to make changes, but want to be able to go back if something goes wrong.
Keep an eye on performance: Virtual machines can use up a lot of resources, so it's important to keep tabs on how they're performing. Use tools like Task Manager to monitor CPU, memory, and disk usage.
Back up your VMs: Just like important documents, you'll want to make sure your virtual machines are backed up regularly. This way, you'll have a copy of your virtual machine in case anything goes wrong.
Automate, automate, automate: Managing virtual machines can be time-consuming, so try using automation tools like scripts or configuration management tools. They can save you time and reduce the risk of human error.
Use templates: Templates are like pre-made blueprints for your virtual machines. They have all the necessary settings and software pre-configured, so you can quickly create new virtual machines without having to start from scratch.
Keep things secure: Make sure to limit access to your virtual machines to only those who need it. Use strong passwords and two-factor authentication to ensure only authorized users can access your VMs.
Conclusion
In conclusion, deploying a Linux virtual machine is not as scary as it may seem! With a little bit of know-how and some helpful guides, you can have your virtual machine up and running in no time. Plus, with the power of virtualization, you can run multiple virtual machines on a single physical machine – it's like having your own army of computers! So don't be intimidated – dive into the world of Linux VMs and get ready to conquer the digital realm!