

Introduction
Imagine you want to make a cake, but you don't have an oven or all the ingredients. What do you do? You could go to a friend's house and borrow their kitchen, but you don't want to mess up their oven. Or, you could rent a kitchen at a bakery, but that could be expensive.
This is where Docker comes in! Docker is like a portable kitchen that you can take with you wherever you go. It has everything you need to make a cake, including the oven, ingredients, and recipe. Plus, it's all self-contained, so you don't have to worry about making a mess in someone else's kitchen.
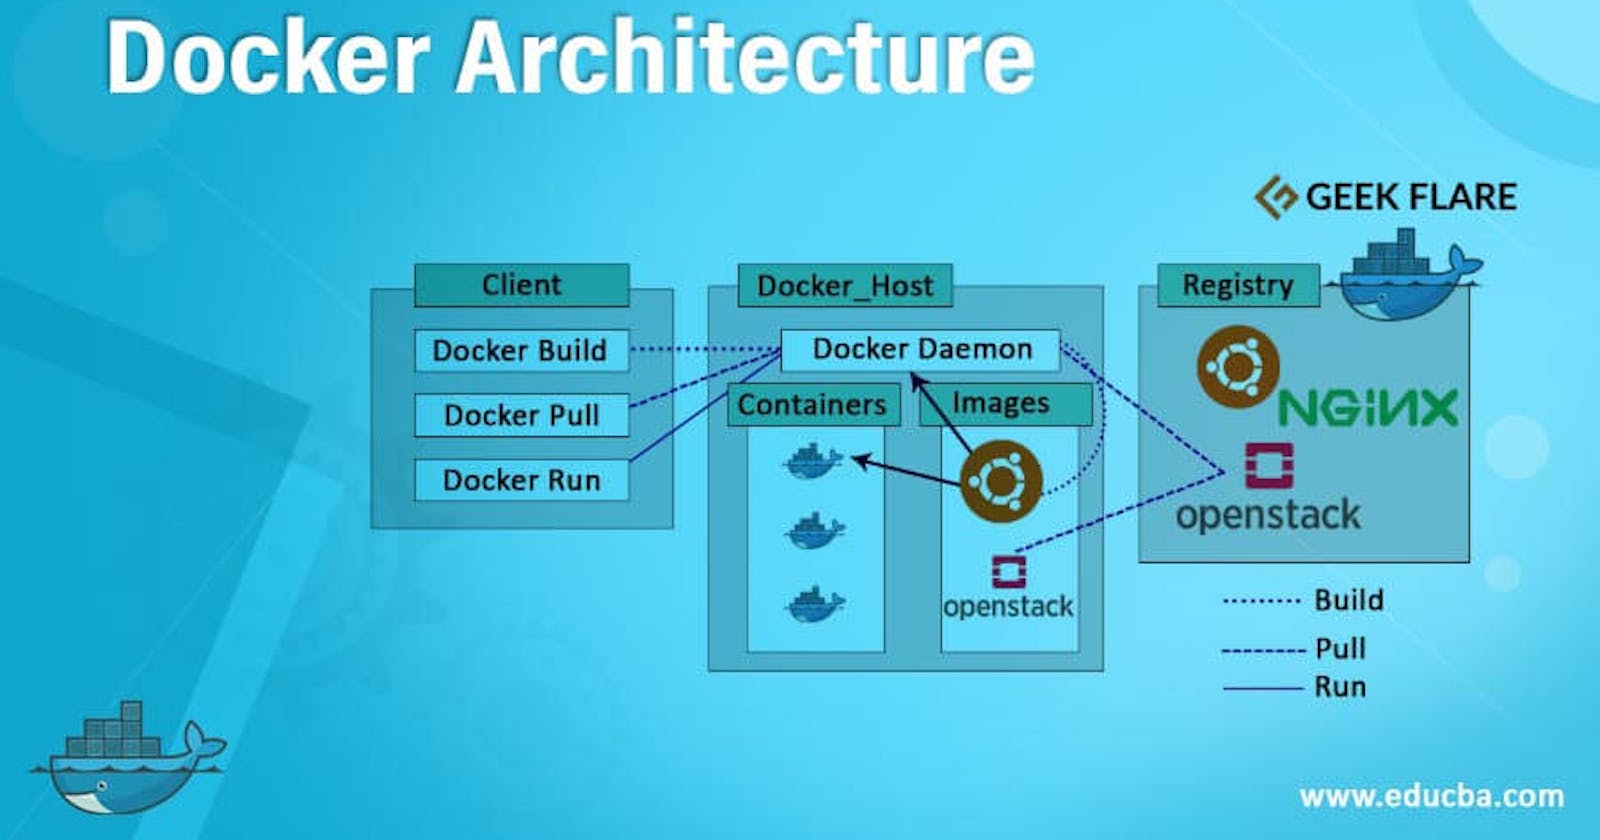
In tech terms, Docker is a platform that allows developers to package their applications and dependencies into a container. This container can then be easily moved between different environments, like from a developer's laptop to a server in the cloud. It helps to ensure that the application works the same way in all environments, regardless of any differences in the underlying infrastructure.
Setting Up and Installing Docker
Here's how to set up and install Docker on different operating systems:
macOS
Go to the Docker website and download the Docker Desktop for Mac installer.
Double-click the downloaded .dmg file to open the installer.
Drag the Docker icon to the Applications folder.
Open the Docker application from the Applications folder.
Follow the on-screen instructions to complete the installation process.
Windows
Go to the Docker website and download the Docker Desktop for Windows installer.
Double-click the downloaded .exe file to open the installer.
Follow the on-screen instructions to complete the installation process.
When prompted, enable the "Hyper-V" feature in Windows.
Restart your computer.
Linux (Ubuntu)
Open a terminal window.
Update the package database and install any available updates:
sudo apt-get update
sudo apt-get upgrade
- Install Docker using the following commands:
sudo apt-get install apt-transport-https ca-certificates curl software-properties-common
curl -fsSL https://download.docker.com/linux/ubuntu/gpg | sudo apt-key add -
sudo add-apt-repository "deb [arch=amd64] https://download.docker.com/linux/ubuntu $(lsb_release -cs) stable"
sudo apt-get update
sudo apt-get install docker-ce
- Verify that Docker is installed correctly by running the following command:
sudo docker run hello-world
This command downloads a small Docker image and runs a container from it. If everything is working correctly, you should see a message that says "Hello from Docker!".
Basic Docker Commands
docker run
The docker run command is used to create a new container from an image. It pulls the image from a registry if it's not already present on the local system and then runs it as a container.
Example:
docker run hello-world
This command pulls the hello-world image from Docker Hub and runs it as a container. The container will display a message and then exit.
docker ps
The docker ps command is used to list all the running containers.
Example:
docker ps
This command will list all the running containers with details such as the container ID, image name, container status, and port mapping.
docker ps -a
The docker ps -a command is used to list all the containers, including the stopped and exited ones.
Example:
docker ps -a
This command will list all the containers, including the stopped and exited ones, with details such as the container ID, image name, container status, and port mapping.
docker stop
The docker stop command is used to stop a running container. It sends a SIGTERM signal to the container process, allowing it to gracefully shut down.
Example:
docker stop container_name_or_id
This command will stop the container with the given name or ID.
docker rm
The docker rm command is used to remove a container. It can only remove a container that is not running. To remove a running container, use docker stop first.
Example:
docker rm container_name_or_id
This command will remove the container with the given name or ID.
docker images
The docker images command is used to list all the images that are available on the local system.
Example:
docker images
This command will list all the images available on the local system with details such as the image ID, repository name, and tag.
docker rmi
The docker rmi command is used to remove an image from the local system.
Example:
docker rmi image_name_or_id
This command will remove the image with the given name or ID from the local system.
docker pull
The docker pull command is used to download an image from a registry.
Example:
docker pull image_name
This command will download the image with the given name from the registry.
docker exec
The docker exec command is used to run a command inside a running container.
Example:
docker exec container_name_or_id command
This command will run the given command inside the container with the given name or ID.
Docker Run Features
Docker run is a powerful command that is used to create and run Docker containers. While the basic usage of Docker run is fairly straightforward, several advanced features can be used to customize the behaviour of Docker containers.
Here are some of the advanced Docker run features and their use cases:
Running in detached mode with -d
The -d option tells Docker to run the container in detached mode, which means that it runs in the background and you don't see the output of the container. This is useful when you want to run a long-lived process or a server in the container.
For example, to run a Redis server in the background, you can use the following command:
docker run -d redis
Mapping ports with -p
The -p option allows you to map a container port to a port on the host. This is useful when you want to expose a service running in the container to the outside world.
For example, to run a web server in a container and map port 80 to port 8080 on the host, you can use the following command:
docker run -p 8080:80 nginx
Mounting volumes with -v
The -v option allows you to mount a directory or file from the host into the container. This is useful when you want to persist data or share files between the host and the container.
For example, to mount a directory on the host called /data into a container at the path /app/data, you can use the following command:
docker run -v /data:/app/data myimage
Setting environment variables with -e
The -e option allows you to set environment variables in the container. This is useful when you need to configure an application or pass secrets to a container.
For example, to set an environment variable called MY_VAR to the value myvalue, you can use the following command:
docker run -e MY_VAR=myvalue myimage
Specifying a command with --entrypoint
The --entrypoint option allows you to specify a command to run in the container instead of the default command specified in the Dockerfile.
For example, to run a container with the command ls -l /app, you can use the following command:
docker run --entrypoint "ls -l /app" myimage
Limiting resources with --cpu-shares and --memory
The --cpu-shares option allows you to specify the CPU shares for the container. This is useful when you need to limit the amount of CPU resources the container can use.
For example, to limit a container to 50% of the CPU resources on the host, you can use the following command:
docker run --cpu-shares 512 myimage
The --memory option allows you to specify the amount of memory available to the container. This is useful when you need to limit the amount of memory the container can use.
For example, to limit a container to 1 GB of memory, you can use the following command:
docker run --memory 1g myimage
Using labels with --label
The --label option allows you to add metadata labels to the container. This is useful when you need to organize and manage your containers.
For example, to add a label called mylabel with the value myvalue, you can use the following command:
docker run --label mylabel=myvalue myimage
As Docker is a broad and multifaceted subject, it is best to approach it one concept at a time. Therefore, in the next article, we will delve into another aspect of Docker to better understand this powerful tool. see ya!